MotoDuvall

repair, restore, outfit

  • About Us
  • Contact Us

Bar Risers and Stainless Steel Hydraulic Lines on a V-Strom

May 11, 2015 by Jim Harriger

Recently, a customer brought me his 2014 Suzuki V-Strom DL1000 with what I thought was a simple request: he wanted to add a set of 2 inch adjustable ROX handlebar risers to the bike. I assured him that the project was eminently do-able and we set about figuring out what it would take to make it happen. A bit of messing around and measuring told me that there wasn’t enough slack in the throttle cables,  the brake , or the clutch hydraulic lines, to make the project a simple bolt-on job.

After the initial assessment, I determined that new throttle cables (two of them, it’s a push/pull setup,) a new hydraulic clutch line, and new hydraulic brake lines were needed. The wiring harness probably needing some re-routing, or maybe extending as well. I gave the client an estimate, and got approval to move forward. I got on the phone, and arranged to order the parts.

A quick call to Galfer USA and a discussion with the very knowledgeable folks and we agreed that replacing only a few of the brake lines in an integrated ABS system, like the V-Strom has, is a bad idea and can lead to inconsistent brake performance. Not what you want in a braking system. Their recommendation was that I purchase and install a complete stainless-steel kit, for optimum and consistent performance. The complete 6-line kit included the front brake upper, lower, and caliper cross-over, rear to abs, rear to caliper, and clutch lines. I contacted the client, explained this, and we agreed to proceed.

First I tackled  the clutch line. The fiddly bit here is that there is a clip holding the stock line to the inside of the frame spar, and the bolt is inserted from the inner side of the frame.

original clutch line retention bolt, V-Strom
The bolt in question is behind the frame here.

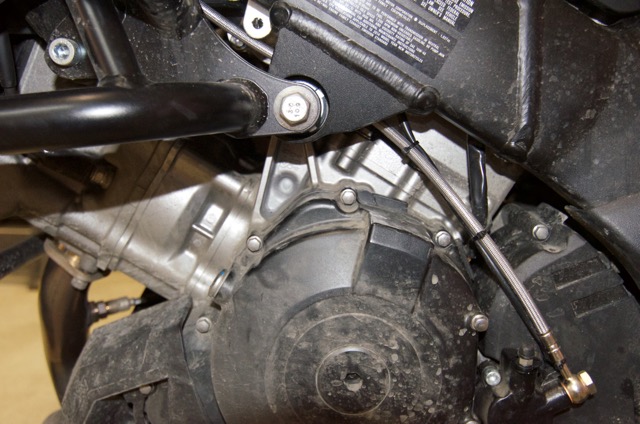
The trick is to use a short socket extension and a crows-foot wrench to loosen the bolt. With a bit of finger contortion the bolt and clip can be removed. When replacing the clip with the supplied clip for the new line, using a small dental mirror to allows you to line up the bolt. It is then tightened with the crows-foot wrench.

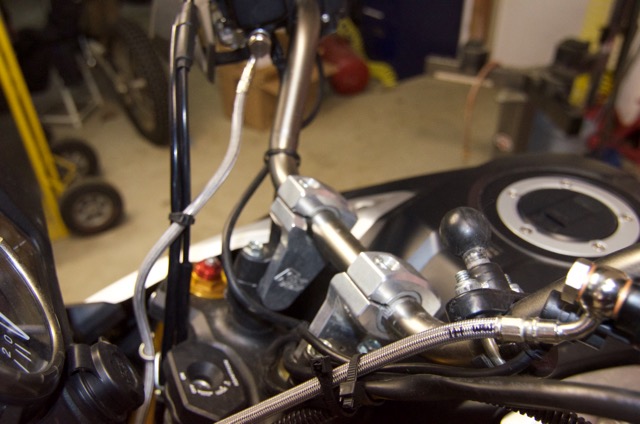
The next tricky part comes when installing the lines for the front brake. What complicates this is that the stock line was fixed to the frame near the steering head by means of a special block-type fitting, with a mounting hole. The connections on the Galfer stainless steel lines are a bit different, and use a clip-type mount, which puts the line in a slightly different position. Fortunately there is enough flexibility in the hard brake lines to accommodate this slight adjustment.

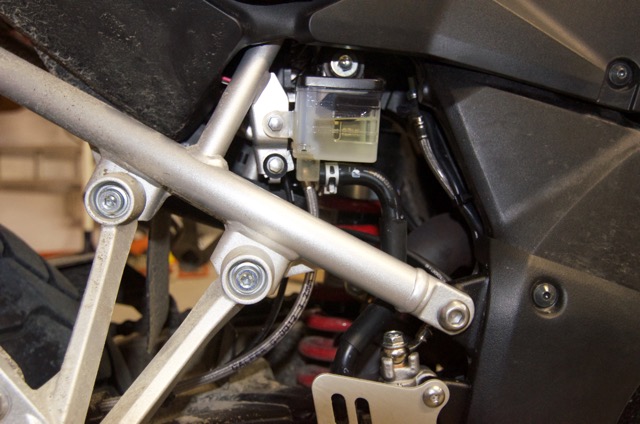
Then it’s time to install the new lines for the rear brake. These lines are behind the right side panel on the bike, behind the brake fluid reservoir for the rear brakes, and snake up to hard-lines which mate up to the ABS controller located just under the seat. You want to be careful here to not put too much torque on the hard-lines themselves, and make sure the routing is as nearly identical to the originals as you can make it. Loosen and then remove the hard lines from the ABS controller, this gives better access to the unions where these lines join the flexible lines. Then remove the flexible lines and replace with the Galfer lines. Last connect the hard-lines back up to the ABS controller

ABS controller and brake lines
Here’s what it looks like when it’s reassembled.

Now you’re ready to install the risers.

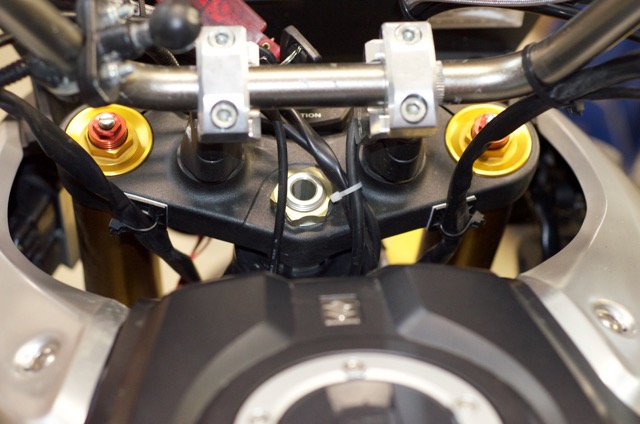
Once the risers are installed it’s time to tackle the wiring harness. With the bars up and back about 2 inches, the wiring harness is stretched too tight. Some experimentation showed that the left and right handlebars harnesses can be run behind the triple clamps as opposed to in front of them. This allows enough length for the full range of steering travel. To make sure the harnesses stayed out of the way of all the moving parts, I captured each one to the back edge of the triple-clamp with a wire-tie and hold down.

New routing of handle bar wiring harness
New wire routing for handlebar wiring harness

Once all the parts are installed it’s time to put new brake fluid in and bleed all the systems. You’ll want to have plenty of fluid on hand; you have many feet of line to fill and get bubbles out of. If you have access to a pressure-bleeder (i.e. one that pushes fluid into the master cylinder under mild pressure,) now is when it pays for itself! Assuming you don’t, I can offer the following tips.

Start slowly with the lever. You need to allow the brake fluid to flow from the reservoir area into the master cylinder. It’s a very tiny hole, and it takes time to get fluid through it. Keep at it;  after enough cycles of the lever, you’ll start to get some air/fluid out of the bleed nipple. Bleed all three systems (clutch, front brake, and back brake) this way until you are getting no more air out of the bleed nipples. If you have a firm pedal and levers, you’re done with bleeding.

In my case, the rear brake and clutch were great, but the front brake lever was still a little mushy. To remedy this, and to make sure the system has absolutely no leaks clamp the lever in the ‘pulled’ position with a woodworking clamp, or a strong rubber band. (For the back brake you can hang a full paint can from the pedal.) Leave it this way for 8-12 hours. When you come back you should find no brake fluid seepage at any banjo bolt or union fitting, and a much firmer lever. This works because air is compressible, and brake fluid isn’t. Holding pressure on the lever makes the bubbles in the fluid really tiny, and over the hours, they float up through the brake fluid and into the master cylinder, through that very tiny hole we talked about earlier, and up into the reservoir. Viola, no more air in the lines.

There you have it. It’s not trivial and it will take six or seven hours. But if you love the bike, and all it needs is a bit of fitting, it is doable. As a bonus, you get complete braided-stainless hydraulic systems!

handle bar rises and new lines installed
The finished project.

Filed Under: Outfit Tagged With: brakes, clutch, Risers, stainles steel lines, V-Strom

Motorcycle Lighting: Looking Forward

November 6, 2014 by Jim Harriger

Darkness I have seen…

Motorcycles typically have less than stellar headlamps, especially if you ride at night, in the rain. Here in the Great Pacific Northwest, hardcore riders do that all the time, else they get precious little riding done October to March.

A quick mental survey of bikes I have owned, and the darkness I have seen runs the gamut:

  • Any 6-volt BMW or British iron, where you have to light a candle to be able to see well enough to ascertain whether or not the headlight is actually producing it’s feeble orange glow.
  • A ’76 Honda CB500T whose headlight so poor that I actually rode off the road on Scholls Ferry Rd in SW Portland one rainy night, taking a shortcut through the ditch. Not healthy.
  • The early BMW K1200LT; a supremely capable touring bike, in a just universe, it should have had a Headlight For The Ages. Instead, it was so bad that I had to replace the bulb with an HID unit, and add 4 (yes 4!) additional PIAA halogen lights. I was told it looked like the Mothership coming up the road. I still couldn’t see very far though. How sad.
  • The KTM 950 Adventure, whose DOT-spec unit met the letter of the law, but did little to actually illuminate things. (The Euro unit was much better, even more so with an HID envelope in place.)
  • And the high-tech proof that motorcycle illumination can be oh, so glorious: the BMW K1600. An auto-leveling HID main beam, flanked by 2 H4 halogen high-beam lights. Add in the fancy ‘tips into corners’ option, and you have the ultimate stock lighting package. Even on a dark, monsoon-infested commute, it shows you the way home.

Ok, let’s say you don’t want to part with the substantial pile of dead presidents needed to put a new BMW in your garage. You still have options to improve your path in the dark.

Starting with the simplest and least expensive. If your bike has a standard incandescent bulb replace it with a halogen bulb. This is a simple 15 minute DIY project on most bikes. Halogens are the most efficient incandescent bulb available. Common types include H4, H3, and H7. Halogens produce more lumens per watt of electricity. The brighter, whiter light helps you see farther. Be aware that some halogens draw more current than a stock headlight. You have to careful about the size of wiring and fuses involved. In some cases this requires sometimes adding an extra set of wires and a relay, taking this option out of the DIY in a few minutes category.

You might also look into the availability of a Euro spec headlamp assembly for your bike. These are often an improvement over the DOT spec items, often coming with upgraded bulb systems. This option can be costly or unavailable depending on your bike.

For better light at the cost of a bit more money than the halogen bulb you can replace your stock headlight bulb with an HID envelope and ballast/drive unit. High-Intensity-Discharge lights, common on European cars and some bikes, use high-voltage to ignite an electric arc in a Xenon gas-filled envelope, or bulb. (Don’t fall for the ebay scammers trying to sell you a blue-colored halogen “Xenon” bulb as HID.) True HID setups produce a very pure, white light, that is much brighter light than Halogen bulbs, on about 1/2 the energy budget. A single HID headlamp unit consumes 25-30 Watts of energy, compared to the standard 55 watts of a Halogen bulb. This generally avoids any concerns with the capacity of your wiring. I’ve taken this approach on several bikes, and it makes a big difference. The pitfall to watch out for here is that since the HID ‘bulb’ is a different shape than a Halogen bulb, the projection pattern of the headlight will change slightly, sometimes becoming a problem. As an example, the KTM 950 Adventure mentioned above; The European headlight assembly, with an HID bulb in place produces good illumination of the road ahead, but it also sends a portion of light straight upwards, from the bottom, forward part of the headlight lens. That light directly illuminates any raindrops of fog right in the face of the rider, reducing visibility.

For even more forward-looking light and to suit your illumination exactly to your riding style and conditions, you can also add auxiliary lights. In the distant past, we were limited to fragile and expensive lights, borrowed from the off-road 4-wheelers. Power hungry, and styling-challenged. They lit up the road, and blinded oncoming drivers, to boot. A handful of years ago, halogen projector-type lights became common and relatively affordable. They can be purchased in a variety of configurations, giving you light patterns that range from wide, low fog lights, to narrow, focused pencil-beam “driving lights”. These are a good choice where cost is a strong consideration, and electrical power is available to run them without overtaxing the bike’s generator or alternator.

Most recently, auxiliary HID and LED lights have become widely available, and are coming down in price, while increasing in output and capabilities every year. If maximal light is your only concern, the auxiliary HID lights are the way to go. If you’re looking for maximum efficiency (ie. you don’t have a lot of excess alternator capacity on your current ride) and controllability (LED lights typically can be dimmed, either as a built-in feature, or via an extra controller), then LED lights are a great way to go.

Installation of auxiliary lights is a DIY project within the grasp of most shade tree mechanics. But if you’re not comfortable messing with your bike’s wiring there are specialists that can do the work for you.

So there’s a quick survey of how to see your way clear in the dark. Next installment: increasing the visibility of your bike in the dark. or “how to avoid becoming a Volvo hood-ornament”.

Filed Under: Outfit

  • Restore
  • Outfit
  • Projects
  • Blog

© Copyright 2014-2018, MotoDuvall, LLC · All Rights Reserved